Showing posts with label Kathy Doughty. Show all posts
Monday, September 5, 2016
Modern Wedge DONE!
This quilt has been a long time coming, but it is finally done. I started it at a workshop over two years ago with Kathy Doughty from Material Obsession. It has been a pondering quilt. I have worked on it off and on, with lots of thinking time in between sewing to figure out what to do next.
The background is quilted with an asymmetric grid, as suggested by Jacqui Gering at the walking foot quilting class I took in the spring.
The curves are quilted with curvy organic quilting--the narrow one is quilted with turquoise thread.
I used red thread on the wider one.
I matched the binding to the background fabric and the adjacent wedges.
While I was taking pictures in my yard this morning, I noticed this decorative grass seed head...
It goes with the curves of my quilt!
Labels:
Kathy Doughty,
modern wedge,
wall hangings
Wednesday, August 17, 2016
Creating Texture
I have spent much of my sewing time over the last 2-3 weeks creating texture in the background of this quilt. I started this top at a workshop in 2014 with Kathy Doughty from Australia. The workshop was called "Modern Wedge".
I put the background together earlier this year and hand appliqued my snaky wedges to the background. I brought the quilt top to the Walking foot quilting class I took in April with Jacquie Gering. It was Jacquie who suggested the asymmetric grid for the background of this quilt. It has taken me several hours, but I am finally finished quilting the texture into the neutrals.
I have an idea of how to quilt the curved parts but wanted to finish the background parts first. Now that this part is done, I can change my thread colour and start on the curves.
Don't forget to come back to see if my idea works!
Saturday, July 23, 2016
Guild Sewing Day
Today was our annual summer sewing day for the London Friendship Quilters' Guild. I brought along too many projects to do in the time available, as usual... I did, however, make a list of three things I really wanted to get done before I went home.
First up...a comfort quilt top that Cathy and I worked on together. These friendship star blocks were made by several members of the guild. We managed to put the 35 blocks together and add the borders. Cathy will quilt this one and someone else will add the binding.
Next up, lunch! I bought all of the ingredients (except for the milk) for my lunch at the local farmer's market this morning.
My second project was a baby quilt--I had made 14 of the blocks before I arrived at the sewing day--I completed the last 5 blocks and set them 4x5. This quilt top was made from a jelly roll that had been in my stash for too long and needed to be used! The solids were scraps leftover from other projects. I have already picked out the backing and the batting is cut and ready to go.
This will be a gift in waiting for a baby someday. It is always good to have a gift ready in case a baby shower invitation comes in the mail.
I also brought along two quilt tops, one of which I hoped to baste before the end of the day. This was my third goal for the day. It counts as my slow stitching project for this week.
I will be working on this quilt this week when Christine comes over for sewing night this week. The other quilt will be basted and quilted once this one is done.
First up...a comfort quilt top that Cathy and I worked on together. These friendship star blocks were made by several members of the guild. We managed to put the 35 blocks together and add the borders. Cathy will quilt this one and someone else will add the binding.
Next up, lunch! I bought all of the ingredients (except for the milk) for my lunch at the local farmer's market this morning.
My second project was a baby quilt--I had made 14 of the blocks before I arrived at the sewing day--I completed the last 5 blocks and set them 4x5. This quilt top was made from a jelly roll that had been in my stash for too long and needed to be used! The solids were scraps leftover from other projects. I have already picked out the backing and the batting is cut and ready to go.
This will be a gift in waiting for a baby someday. It is always good to have a gift ready in case a baby shower invitation comes in the mail.
I also brought along two quilt tops, one of which I hoped to baste before the end of the day. This was my third goal for the day. It counts as my slow stitching project for this week.
I will be working on this quilt this week when Christine comes over for sewing night this week. The other quilt will be basted and quilted once this one is done.
Saturday, February 20, 2016
Modern Wedge Slow Stitching
To prepare for Slow Sunday Stitching tomorrow, tonight, I hand basted the wedges down to the background on my modern wedge quilt. I started this quilt at a workshop taught by Kathy Doughty from Material Obsession in Australia when she was in Ontario a couple of years ago. I have been playing around with layouts on my design wall for a few weeks now and finally settled on this layout:
I used red thread for the basting. I thought about just pinning the curved sections on but was afraid that the pieces would shift as I sewed them.
Basting on the wider wedges:
I am turning under about a 1/4" as I sew and trying to keep a smooth curve in the process. So far, so good!
Next, I will have to figure out how to quilt this project. I am going to do it on my DSM. If you have any ideas, please let me know! The London Friendship Quilters Guild is having their quilt show this October and I want to finish off a few of my UFO's in time to put them in the show.
I will be linking up with the other slow Sunday stitchers at Kathy's blog.
Labels:
applique,
Kathy Doughty,
modern wedge,
slow Sunday stitching
Tuesday, February 2, 2016
My New Design Wall
I have wanted a design wall for a long time...probably forever!!! Since setting up my new sewing room last Summer, I have been contemplating which wall I would use as a design wall. I finally made a decision and my husband went out a couple of weeks ago and purchased some rigid foam insulation. Then, this past weekend, we bought the rest of the supplies...duct tape and command strips. I ordered the flannel design wall fabric (gray with a grid on it--designed by Kaffe Fasset) from Hyggeligt (there is a link in my sidebar) in St. Mary's, Ontario. The fabric got washed, dried and ironed on the weekend so we were all ready to work on assembly by Sunday night. We actually worked on this for two evenings--Sunday and Monday.
First, we measured the height of the wall--in my case--81" from the top of the baseboard to the ceiling. I used a utility knife and a drywall T ruler to cut the insulation to the right height. I used 4 two feet wide pieces of 1" thick insulation.
We used duct tape to put two boards together to make two 4' wide sections. We taped the seam on both sides of the board.
I had to sew a seam down the middle of the fabric and then cut it into two sections--one for each section of the design wall. There was 2-3 inches of fabric to wrap around to the back of the insulation on all sides. We used duct tape to tape the fabric to the board. We taped the bottom first and then stretched it and taped the top followed by the sides. We tried to keep the lines on the grid straight on the sides and top of the design wall as we taped it.
You can see the seam in the middle of the design wall. This is the first finished section before we hung it on the wall.
We had to cut a hole in the second section for an electrical outlet. We cut the hole before taping the fabric to the insulation. I cut an "X" in the fabric where the hole was and used duct tape to tape each part of the X to the back of the hole.
We hung the section with the hole in it first to make sure everything lined up properly. The bottom edge of the design wall rests on the top of the baseboard.
I did not want to use anything that would damage the wall. The hardware store had these nifty hook tape command strips by 3M --I purchased 4 packages.
It took me a while to figure out that I needed to take two strips and book them together like this to make this work for the design wall.
I scrunched them together and took the paper off one side so I could stick it to the back of the design wall.
There are four of these across the top and three across the middle and bottom of each section. We carefully leaned the bottom of the section along the top of the baseboard and once we were sure we had lined everything up properly, pressed it to the wall to get it to stick.
It worked! And, if I ever have to take the design wall down, there should not be any damage to the wall or the paint.
It did not take me long to start adding projects to the wall and put it to good use...
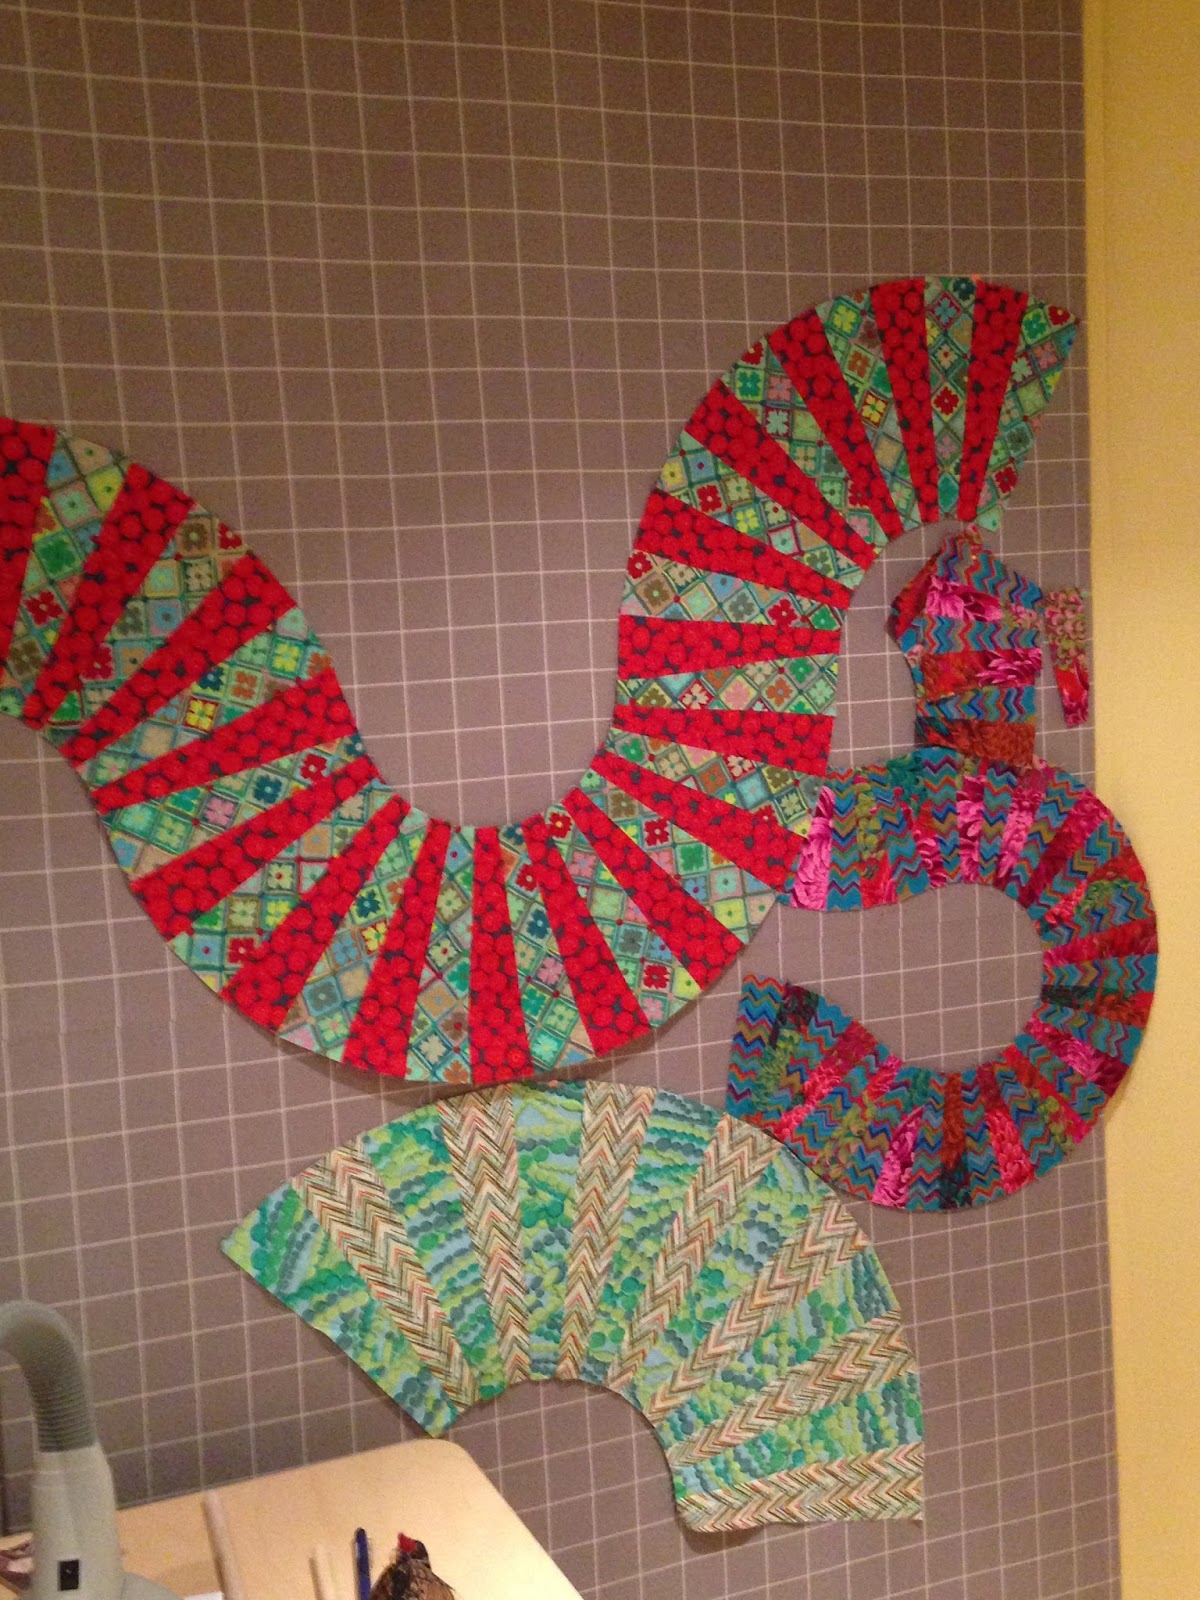
This project is from a workshop I did 2 or 3 years ago with Kathy Doughty (from Material Obsession in Australia). I need to rearrange the pieces and make a background. I want to get this UFO done but needed a design wall to get it all laid out. No excuses now for not getting it done!
I am just thrilled with my new design wall and can't wait to get sewing and add more blocks to the wall.
I also hung up my Mexican Stars quilt and a counted cross stitch picture I made years ago in my sewing room. I have a few more quilts to hang up in there too but they need hanging sleeves. I will post more pictures as I get them hung up.
Now...off to sew!!!
First, we measured the height of the wall--in my case--81" from the top of the baseboard to the ceiling. I used a utility knife and a drywall T ruler to cut the insulation to the right height. I used 4 two feet wide pieces of 1" thick insulation.
We used duct tape to put two boards together to make two 4' wide sections. We taped the seam on both sides of the board.
I had to sew a seam down the middle of the fabric and then cut it into two sections--one for each section of the design wall. There was 2-3 inches of fabric to wrap around to the back of the insulation on all sides. We used duct tape to tape the fabric to the board. We taped the bottom first and then stretched it and taped the top followed by the sides. We tried to keep the lines on the grid straight on the sides and top of the design wall as we taped it.
You can see the seam in the middle of the design wall. This is the first finished section before we hung it on the wall.
We had to cut a hole in the second section for an electrical outlet. We cut the hole before taping the fabric to the insulation. I cut an "X" in the fabric where the hole was and used duct tape to tape each part of the X to the back of the hole.
We hung the section with the hole in it first to make sure everything lined up properly. The bottom edge of the design wall rests on the top of the baseboard.
I did not want to use anything that would damage the wall. The hardware store had these nifty hook tape command strips by 3M --I purchased 4 packages.
It took me a while to figure out that I needed to take two strips and book them together like this to make this work for the design wall.
I scrunched them together and took the paper off one side so I could stick it to the back of the design wall.
There are four of these across the top and three across the middle and bottom of each section. We carefully leaned the bottom of the section along the top of the baseboard and once we were sure we had lined everything up properly, pressed it to the wall to get it to stick.
It worked! And, if I ever have to take the design wall down, there should not be any damage to the wall or the paint.
It did not take me long to start adding projects to the wall and put it to good use...
This project is from a workshop I did 2 or 3 years ago with Kathy Doughty (from Material Obsession in Australia). I need to rearrange the pieces and make a background. I want to get this UFO done but needed a design wall to get it all laid out. No excuses now for not getting it done!
I am just thrilled with my new design wall and can't wait to get sewing and add more blocks to the wall.
I also hung up my Mexican Stars quilt and a counted cross stitch picture I made years ago in my sewing room. I have a few more quilts to hang up in there too but they need hanging sleeves. I will post more pictures as I get them hung up.
Now...off to sew!!!
Monday, May 26, 2014
The Modern Wedge --workshop with Kathy Doughty
My friend, Debbie, and I had a wonderful day in Brantford last week at a workshop organized by the Red Red Bobbin quilt shop. I had read about the workshop on Nancy's blog a few months ago and immediately signed up and invited Debbie to join me. Kathy Doughty, of Material Obsession fame, has been travelling all over the US and made one stop in Canada to do three days of workshops at the Red Red Bobbin. Kathy's husband, John, joined her on her trip--he loves to travel and is a wonderful photographer, quilt holder, suitcase lugger and supporter of Kathy! He even helped some of the participants in with their machines, bags and bins of fabric! Here is a picture of Kathy talking about one of her quilts--that is John holding the quilt.
Kathy and John live in Australia and the twenty ladies taking the class were thrilled to see several of her quilts from her recent books--Adding Layers and Making Quilts.
The theme of our workshop was the Modern Wedge and Kathy showed us several examples of what can be done with a wedge ruler and some imagination!
Fussy cutting the fabrics can lead to some fun circles!
This one is called vintage spin.
This one is made by sewing strips together before cutting the wedges.
This is an example of a pieced background for some appliqued circles made from wedges. (John the quilt holder's feet are at the bottom of the quilt!)
The circles can be layered on top of each other for a fun effect.
(Those are my feet this time...)
How about points at both ends of the wedges???
I started by sorting my fabrics into two piles--warm colours and cool colours.
I chose these two fabrics to start and cut out a few wedges and started playing on the design wall. Note how the red recedes and the green fabric comes forward!
My circle told me it wanted to go into a different direction.
Kathy suggested cutting out some shorter wedges in two darker fabrics so that that my next "worm" would recede more than the first one.
Then, two lighter colours in longer wedges were added...I like where this is going! Kathy and I discussed background fabric ideas...She asked me if I have any dark fabrics in my stash??? Silly question, I told her! I would like to try making a pieced background and will work on this over the summer so I can put this quilt into the London Friendship Quilters' Guild show this fall.
Debbie made several circles on her design wall and is well on her way to a beautiful quilt!
Thank you, Kathy, for a wonderful, fun and inspiring day! We hope to see you again sometime.
I did some gardening on the weekend...
Kathy and John live in Australia and the twenty ladies taking the class were thrilled to see several of her quilts from her recent books--Adding Layers and Making Quilts.
The theme of our workshop was the Modern Wedge and Kathy showed us several examples of what can be done with a wedge ruler and some imagination!
Fussy cutting the fabrics can lead to some fun circles!
This one is called vintage spin.
This one is made by sewing strips together before cutting the wedges.
This is an example of a pieced background for some appliqued circles made from wedges. (John the quilt holder's feet are at the bottom of the quilt!)
The circles can be layered on top of each other for a fun effect.
(Those are my feet this time...)
How about points at both ends of the wedges???
I started by sorting my fabrics into two piles--warm colours and cool colours.
I chose these two fabrics to start and cut out a few wedges and started playing on the design wall. Note how the red recedes and the green fabric comes forward!
My circle told me it wanted to go into a different direction.
Kathy suggested cutting out some shorter wedges in two darker fabrics so that that my next "worm" would recede more than the first one.
Then, two lighter colours in longer wedges were added...I like where this is going! Kathy and I discussed background fabric ideas...She asked me if I have any dark fabrics in my stash??? Silly question, I told her! I would like to try making a pieced background and will work on this over the summer so I can put this quilt into the London Friendship Quilters' Guild show this fall.
Debbie made several circles on her design wall and is well on her way to a beautiful quilt!
Thank you, Kathy, for a wonderful, fun and inspiring day! We hope to see you again sometime.
I did some gardening on the weekend...
Labels:
gardens,
Kathy Doughty,
modern wedge,
workshops
Subscribe to:
Posts (Atom)