Showing posts with label classes. Show all posts

Saturday, February 20, 2021

QuiltCon Together - Virtual Classes

Like all big events right now, QuiltCon has gone virtual this year.  I took the opportunity to sign up for four virtual classes and I also purchased a lecture pass. I cleared my schedule (not that there is much on it these days!) and cleaned up my sewing room so I would be ready!  I gathered all of the supplies I needed for my classes and put them into 4 bins.  One teacher recommended that we cut out most of our pieces before class so I managed to get that done too. I decided from the beginning that I would use fabrics from my stash for my classes which meant I had to be creative with my colour choices.  (I did have to purchase a jelly roll for one class as I did not have one in my stash.)

My first class, "Put a Ring on it", was taught by Latifah Saafir. This quilt uses the Clammy rulers that Latifah invented and she has produced multiple patterns that use them. The classes are available during QuiltCon Together on demand--they were pre-recorded by each teacher and are divided into steps so that you can stop the video to complete that part of the project before proceeding.  I decided to take this class the first day--Thursday.  Since I had most of the cutting done, I could dive right in to making a block. As you can see, this involved lots of curved piecing.  This is my first "Petal".


Soon I had 4 done. 


I started to put the block together. 

TaDa!!  One block (or ring) together.


I have since finished one more ring and will get back to working on the remaining rings and joining them together on Monday. 

My second class was Big Stitch hand quilting with Sarah Fielke. I had prepped my quilt sandwich with some Essex Linen ahead of time. Sarah suggested we do a sampler or practice piece to start.  She demonstrated several stitches that would be interesting to use for quilting and gave lots of tips on ergonomics while hand sewing.  I decided to make some circles to quilt and traced out several circles using dishes from my kitchen.  I had a spool of 12 wt turquoise thread and used it to do a chain stitch around the first circle.  


 My second circle was completed using orange Prevencia 8 wt thread. 


Here are the two circles. 


A third green buttonhole stitch circle was added today.  


I had a live chat with Sarah and 4 other members of the class this afternoon.  Sarah was very helpful in answering all of our questions.  It was Sunday morning in Australia where she lives. This hand quilting project is a work in progress and will take a while to finish. 

My third class, Hand Embroidered Quilt Labels, was with Claudia Martinez.  I have done lots of embroidery before but have never made an embroidered quilt label.  I decided to make a label for my Lupins quilt, which is still not put together but all of the blocks are done.  Maybe making the label will light a fire under me to put the quilt together!  I started with the lupin. I used stem stitch on the stems and small lazy daisy stitches for the flowers.  There are four strands of thread in the flowers in two shades of purple. 


 I have lettering to stitch as well but did not start it yet. 

Tomorrow, I will take my 4th class with Sarah Bond. I will report on it next week. 

While "attending" some of the lectures, I have been working on "Love Birds".  


My daughter is still stitching every day on her coffee stitch along with the Barmy Fox.  There are four more days left in this project. 


I love the blue buttonhole stitch flower, top right.  It's fun to see what gets added to the picture each day. 

Finn went for a walk in the snow tonight and came home with a snow beard. 


Have a great week. I'm having lots of fun taking classes and learning new things at QuiltCon Together.  The organizers have done a fantastic job making this virtual event possible for thousands of quilters all around the world.  I will link up with Kathy and the slow stitchers in the morning. 


Wednesday, April 13, 2016

Walking Foot Quilting Class with Jacquie Gering

This past Thursday and Friday, Christine and I spent two days with Jacquie Gering in St. Mary's, Ontario taking a class on quilting with your walking foot. WOW!!!  We had a wonderful time!!  and we learned lots of new ideas for quilting our own quilts on our domestic machines.  We had to prepare 10 quilt sandwiches before class.  I hand basted mine but most people used spray baste.

We started by talking about straight line quilting.  My sewing machine walking foot is 3/8" from needle to the edge of the foot.  Other walking feet were 1/2".  Jacquie explained how to keep the lines straight by adding painters tape to our projects and using a ruler to measure how far to the tape at the top, middle and bottom of the project. 


These lines were 3/8" apart.  I then subdivided them...


And then again... (but I did not take a picture!)  This is called matchstick quilting and can add wonderful texture to a project.   Jacquie showed us her notebook cover below as a great example of matchstick quilting.  A friend made this cover for her. 


Next, we did some gently curved lines. I used a hera marker to make the first line and then used the edge of my walking foot to sew each line.


We had time after each lesson to try out each type of quilting pattern.


Since everyone was getting quite comfortable with curves, we did some organic quilting next.  I have done lots of this type of quilting in the past.  Jacquie encouraged us to let some of the lines cross to make them look like ribbons. The possibilities are endless!


Spiral quilting was up next...I had already done this on a quilt I showed in my last post, so I spent my practice time learning how to spiral into the centre of the circle.  I made two attempts at this and the second was much better than the first...I think I need to practice more before doing this on a real quilt.  Again, no pictures...sorry.
 
Jacquie showed us a sample "book" she made of all of the fancy stitches on her sewing machine, sewn at different stitch lengths and widths.  She has a notebook with all the information about each stitch and uses her sample stitches to pick quilting stitches for her quilts.  These stitches can add wonderful texture to a project.


I used one of my quilt sandwiches to try out some stitches on my machine.   I have actually quilted a table topper with fancy stitches before.
 
I labelled my stitches right on my sample.
 
This is called Orange Peel quilting--we had to draw a grid on our fabric and then sew curved lines between the intersections.  Jacquie showed us lots of examples of all of the quilting stitches on her own quilts as well as lots of variations for each of the stitches. 
 
 
I would like to bottle some of Jacquie's energy and ideas!  It was a wonderful two days and I can't wait to try out some of the ideas we discussed and practiced on my own quilts!
 
 
Thanks, Jacquie!!!


Monday, August 18, 2014

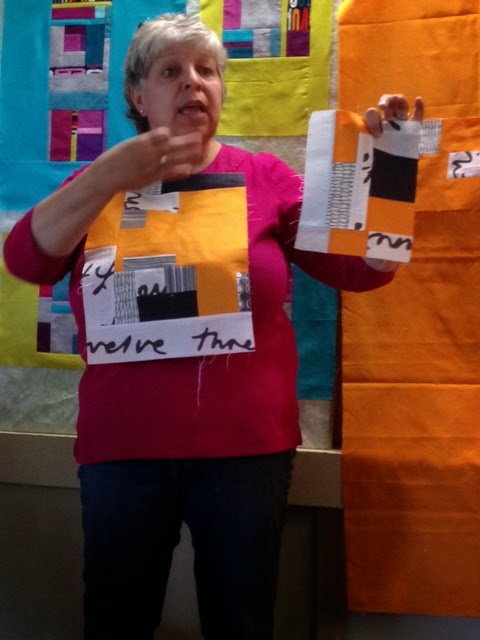
Improvisational Piecing with Jacqui Gering

This past Friday, Christine and I attended a workshop at Black Creek Pioneer Village in Toronto. The York Heritage Quilters organized the workshop and had their members' quilts displayed around the pioneer village on Saturday and Sunday. I had so much fun at the Flip and Stitch workshop that Jacqui taught at the London Friendship Quilters' Guild in the spring, that we decided to sign up for another class. 


I love the quilting on Jacqui's class sample! 

Jacqui started out by showing us her quilt and asking us what we saw.  She explained how she just grabbed a handful of scraps out of her green, brown and orange bins and started to make blocks for her quilt.


She taught us how to add angled pieces to our blocks and about how the background fabric should make pathways into and through the blocks.

Orange is Jacqui's favourite colour...

Her mantra for the day "let it go".  Forget the "rules".  I love her style!


There were 25 students in the class and she made it around to see everyone and talk about fabric choices and ideas for blocks before lunch. I had brought some selvage fabric with me, leftover from BIQR last September. Jacqui suggested I use small bits of the selvage fabric and cool coloured scraps (blues, greens and purples--lights, mediums and darks of each). I had brought a bin full of all my scraps and white background fabric. The scraps were all in zip lock bags by colour so I did not have to dig through a jumble of scraps to find what I wanted.


Here are my first couple of blocks.  I got a bit more daring on my next block...


This one was Jacqui's favourite of all the blocks I made.
 
 
After lunch, she showed us how to take our odd sized blocks and put them together into a quilt. That is blue masking tape on the design wall...
 
 
This quilt was a sample for Saturday's slash and insert class.   Jacqui showed us her sample quilts for the next day's class and talked about how she quilts most of her quilts on her domestic sewing machine. She uses a lot of thread as her quilts are densely quilted and the quilts have lots of texture as a result.  (Take a look at the picture at the top of this blogpost!)
 
Christine and I had a great day!  Here are the blocks that I had finished by the end of the day...
 
 
Christine and I will be getting together tonight to work on our quilts again. I would like to have this done before our guild show in October.
 
 
Thanks for a great workshop!  I went home inspired to keep playing with my scraps.


Thursday, June 28, 2012

Mexican Stars Class--Part 2

Tonight, I went to my second and last Mexican Stars class at Pat's house. It was fun to see everyone's blocks coming together.

The fabric and colour choices made each block really sing, and each one sang a different song!

Seeing the colours that everyone used makes me want to make a second Mexican Stars wall hanging...

This is one of my corner blocks with the curves completed.

At the end of the evening, I had all my blocks together and took it home to add the stitching to make the curves.

Here are some of Christine's blocks:

And Karen's...


And last, but not least, here are Beth's:
I hope I have a chance to see each wall hanging when they are done!

Thursday, October 21, 2010

30's Spin Class

This past Saturday, I went to a 30's Spin class organized by the London Friendship Quilt Guild. The quilter who taught the class is from England and comes to visit her friends in Canada every year. Last year, she did a disappearing 9 patch class which I also attended.

This is a strip quilt and goes together quite quickly. I learned the hard way that I need to make sure I sew each unit exactly the same or it does not work out very well!

My first two blocks are the bottom two. Christine and I shared a table and she is using 30's prints for her quilt.

By the end of the day, I had made 22 blocks. I hope to use 42 blocks in this quilt to make it a lap sized quilt. It will be a Christmas gift so I have to get cracking and get it done!


Here are a few more of my blocks part way through the afternoon. This quilt will be called Country Spin.

I had fun at this workshop and pleased with my progress so far. It is always fun to see what fabrics others are using and how the personality of the project changes based on what fabrics are used.

Today's goal is to make my neice's birthday pj's. Their birthday is on Sunday so the deadline is looming!