Saturday, February 27, 2016

Pillow progress

One night this past week, I paper pieced the last 4 arcs for the pillow I am making.  

Here are all 16 arcs, trimmed and ready to go. 


I tried to machine sew the small 1/4 circle onto the arc, but that did not work...  I unstitched and decided to hand stitch it instead.  This method worked out much better!  I was able to machine sew the outer part of the arc to the bigger piece of the block.  

Here is the first block of 16...


Only 15 to go.  They are 5" squares finished.  

In the meantime, I am just about done appliquéing the modern wedge quilt and hope to finish it off tomorrow during Slow Sunday Stitching.  

Saturday, February 20, 2016

Modern Wedge Slow Stitching

 
To prepare for Slow Sunday Stitching tomorrow, tonight, I hand basted the wedges down to the background on my modern wedge quilt. I started this quilt at a workshop taught by Kathy Doughty from Material Obsession in Australia when she was in Ontario a couple of years ago.  I have been playing around with layouts on my design wall for a few weeks now and finally settled on this layout:


I used red thread for the basting. I thought about just pinning the curved sections on but was afraid that the pieces would shift as I sewed them. 
 
 
Basting on the wider wedges:


I need to get this project finished up so that I can free up half of my design wall for my daughter's new quilt.  There are lots of pieces to keep track of and they all need to stay in the right places or the pattern will not work out properly.   I washed the fabric for her quilt this week and will start cutting this week.  In the meantime, I will be hand appliqueing the wedges down onto the background fabric.  I started tonight with the narrow wedges...

I am turning under about a 1/4" as I sew and trying to keep a smooth curve in the process. So far, so good!

Next, I will have to figure out how to quilt this project.  I am going to do it on my DSM. If you  have any ideas, please let me know!  The London Friendship Quilters Guild is having their quilt show this October and I want to finish off a few of my UFO's in time to put them in the show.

I will be linking up with the other slow Sunday stitchers at Kathy's blog.

Thursday, February 18, 2016

Puttering in the Sewing Room


I have spent a few evenings in the sewing room during the last couple of weeks.  I made another house for my 30's prints neighbourhood--this is house #3.


I put together the 9th liberated basket quilt for my basket sampler quilt from the workshop I taught in January.  I used selvages for this basket.  If you look closely, you can see that the handle fabric also has scissors on it. I have some machine applique to do on one more block before I can assemble this quilt top.
 
Last week, I celebrated my birthday and my husband gave me a couple of quilting books..."Free Range Triangle Quilts" by Gwen Marston and Cathy Jones, and "Quilt Lovely" by Jen Kingwell.  There are lots of inspiring quilts in both books.  I was drawn to a quilted pillow in Jen's book and decided to make one for myself.  I need 16 paper pieced arcs for this pillow.  These are the first two arcs.
 
 
I have been working on more arcs and have 10 done now.  I need to go digging through my scraps before I make the last 6. They are not very big and will measure 2" in the finished blocks.  There is quite a bit of curved piecing in this pillow...I will get to that when I finish the arcs.
 
 
I have figured out the final layout for the modern wedge quilt.  I took the lighter wedges off the wall and will use them in another project.  I will be hand appliqueing the curvey parts onto the background, perhaps as my slow Sunday stitching project this weekend.


It was cold and frosty on my way to work this morning so I just had to stop the car at the side of a country road and take a few pictures.  Everything looked so sparkly!


Sunday, February 14, 2016

Chicken Quilt Label


This week, I made a 6" chick block from Lori Holt's "Farm Girl Vintage" book as a label for my chicken quilt.  This involved some embroidery to give the chick some legs!

Here is the completed block:


I turned under a 1/4" on all sides and machine top stitched it to the backing of the quilt.  The quilt is all ready to go to Cathy's house for long arm quilting.  Here is the backing fabric:


Here is the front of the quilt:


I'm calling it "In The Coop."


My daughter and I went shopping for fabric for a new quilt for her yesterday at Mad About Patchwork.  She graduated from university last year and has finally decided on a pattern and fabric for her grad gift.  This will be my project for the next little while!!!  It will be queen sized...

Monday, February 8, 2016

This and That

Since my design wall was installed last week, I have been puttering in my sewing room on various projects.  I made a second house block using my 30's prints.  They look like good neighbours!

I also made some more mug blocks.  We will call this picture a "mug shot"...  The darker blue one on the left side may be too dark for this little quilt so it may become a mug rug.

The colours for this month's block for the Elgin Piecemaker's charity quilt are rust, brown and cream.  I designed this block myself...no pattern used.


I also made a low volume rail fence background for my modern wedge quilt.  This is one block of 12.  I figured I used almost two yards of fabric for this project...funny how the bin of low volume fabrics still looks just as full.

I have been playing with how to arrange the wedges on the background...this is why I wanted a design wall before completing this project.  I have not made a final decision yet and would welcome any comments you have about the layout of the quilt...


I am not sure I have found the right layout yet...

Have a good week!

Tuesday, February 2, 2016

My New Design Wall

I have wanted a design wall for a long time...probably forever!!!  Since setting up my new sewing room last Summer, I have been contemplating which wall I would use as a design wall.  I finally made a decision and my husband went out a couple of weeks ago and purchased some rigid foam insulation. Then, this past weekend, we bought the rest of the supplies...duct tape and command strips.  I ordered the flannel design wall fabric (gray with a grid on it--designed by Kaffe Fasset) from Hyggeligt (there is a link in my sidebar) in St. Mary's, Ontario. The fabric got washed, dried and ironed on the weekend so we were all ready to work on assembly by Sunday night. We actually worked on this for two evenings--Sunday and Monday.

First, we measured the height of the wall--in my case--81" from the top of the baseboard to the ceiling.   I used a utility knife and a drywall T ruler to cut the insulation to the right height.  I used 4 two feet wide pieces of 1" thick insulation.

We used duct tape to put two boards together to make two 4' wide sections.  We taped the seam on both sides of the board.


I had to sew a seam down the middle of the fabric and then cut it into two sections--one for each section of the design wall. There was 2-3 inches of fabric to wrap around to the back of the insulation on all sides.   We used duct tape to tape the fabric to the board.  We taped the bottom first and then stretched it and taped the top followed by the sides.  We tried to keep the lines on the grid straight on the sides and top of the design wall as we taped it.

You can see the seam in the middle of the design wall.  This is the first finished section before we hung it on the wall.


We had to cut a hole in the second section for an electrical outlet. We cut the hole before taping the fabric to the insulation. I cut an "X" in the fabric where the hole was and used duct tape to tape each part of the X to the back of the hole.


We hung the section with the hole in it first to make sure everything lined up properly.  The bottom edge of the design wall rests on the top of the baseboard.


I did not want to use anything that would damage the wall.  The hardware store had these nifty hook tape command strips by 3M --I purchased 4 packages.


 It took me a while to figure out that I needed to take two strips and book them together like this to make this work for the design wall.


I scrunched them together and took the paper off one side so I could stick it to the back of the design wall.


There are four of these across the top and three across the middle and bottom of each section.  We carefully leaned the bottom of the section along the top of the baseboard and once we were sure we had lined everything up properly, pressed it to the wall to get it to stick.

It worked!  And, if I ever have to take the design wall down, there should not be any damage to the wall or the paint.


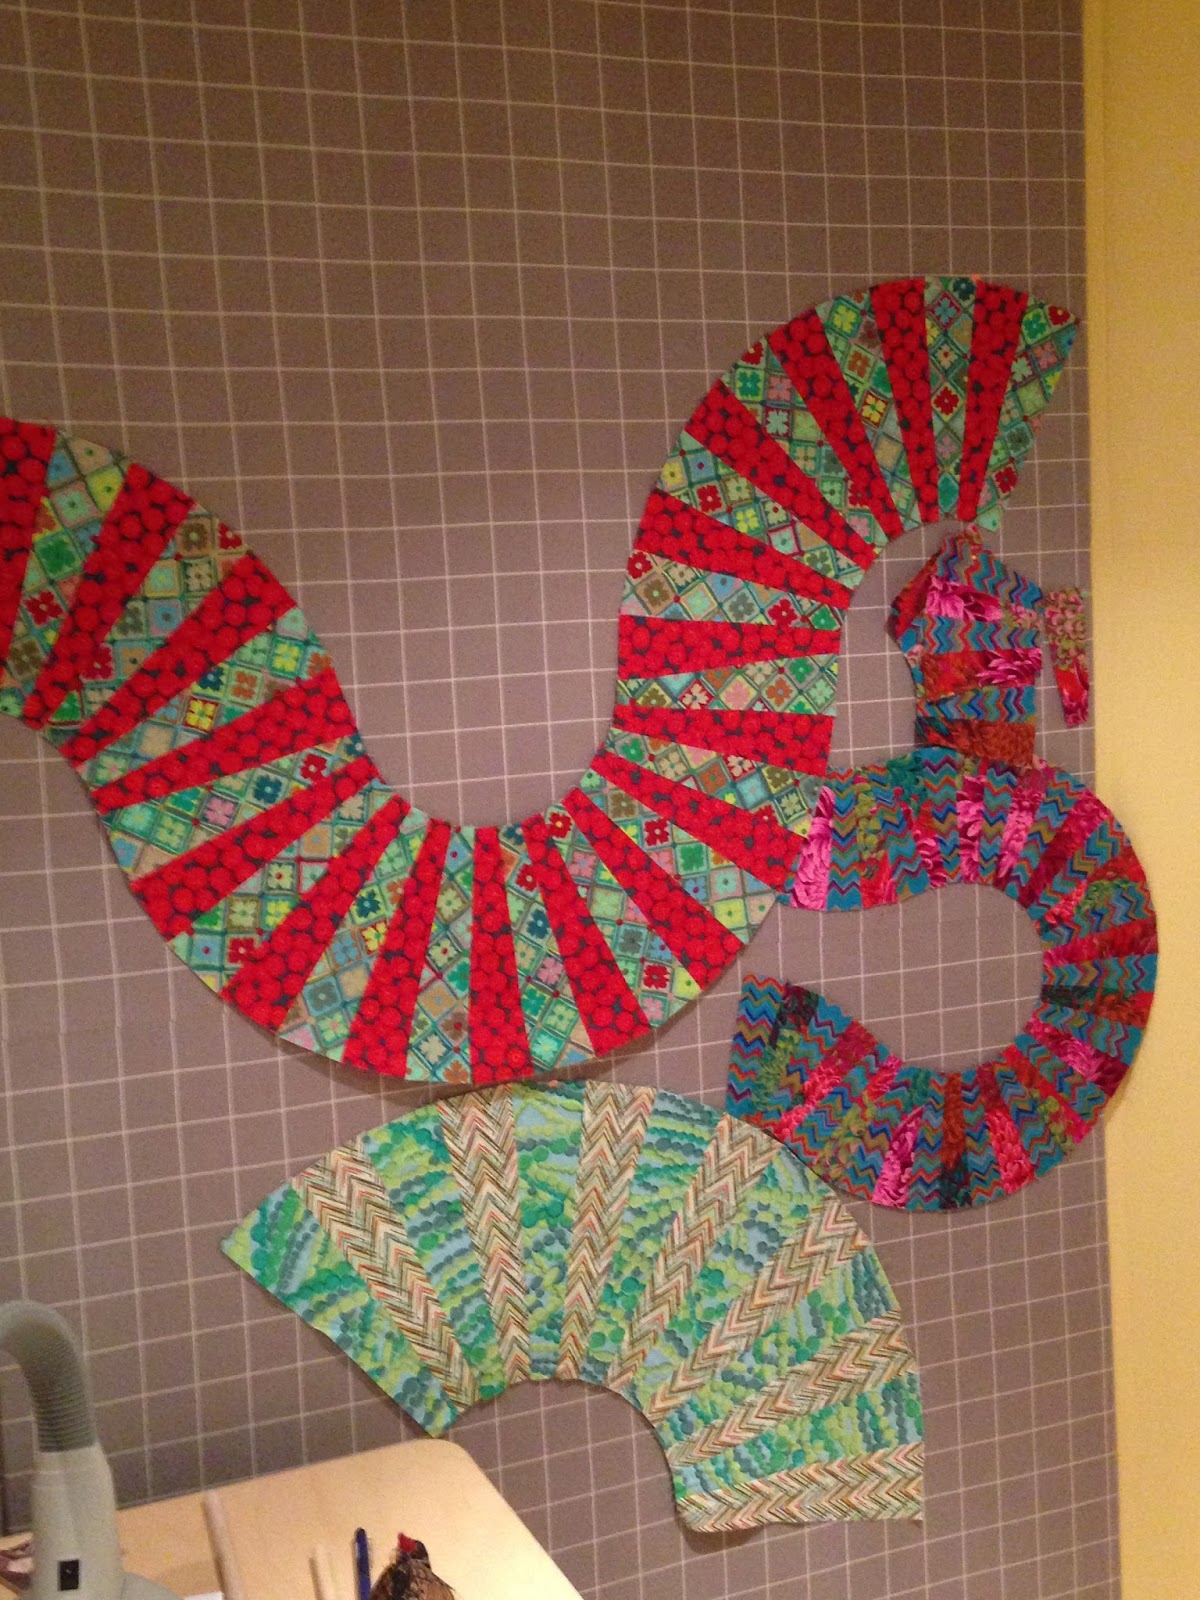
It did not take me long to start adding projects to the wall and put it to good use...


This project is from a workshop I did 2 or 3 years ago with Kathy Doughty (from Material Obsession in Australia).  I need to rearrange the pieces and make a background.  I want to get this UFO done but needed a design wall to get it all laid out.  No excuses now for not getting it done!


I am just thrilled with my new design wall and can't wait to get sewing and add more blocks to the wall.

I also hung up my Mexican Stars quilt and a counted cross stitch picture I made years ago in my sewing room.  I have a few more quilts to hang up in there too but they need hanging sleeves.  I will post more pictures as I get them hung up.

Now...off to sew!!!